Pool Day Mani: Hot Pink & Chevrons
Wednesday, June 26, 2013
6/26/2013 12:32:00 PM
I hope everyone has been having an enjoyable week so far. I had a pretty shitastic Tuesday yesterday, so I've got high hopes for Wednesday being better.
Story time: My dad is a real estate agent. Yesterday he needed a house opened up for a client to do a final walk through, but his (my dad's) flight wouldn't get in on time to accommodate this. So I drove 45 mins both ways to the house to unlock it for him, only to get there and find out that it was a combo lock and I didn't need to be there. The not-so-awesome agent could have just told us that and saved me an hour and a half. And then on the way home I got a flat tire. And said multiple curse words. I wasn't a happy camper, but I did feel like a BAMF because I had that tire changed in under 15 minutes and I was on my way again. So anyways, as far as I'm concerned that stupid guy owes me a new tire.
Anyways, on to the nails. I did these for pool day with the girls on Saturday. I've had this idea in the back of my head and I knew I'd seen it before. After checking my Pinterest, I found this pin with this link, but I can't find the original picture. If you know who the original artist was, be sure to let me know so I can credit them properly.


To accomplish this look I painted China Glaze Pool Party on my thumb, pointer, and pinkies. On my middle finger I put down a base of Sally Hansen Ivory Skull and stamped it using Konad Black with a design from plate Mash 45. My ring finger got the bling treatment with China Glaze Glistening Snow.
What do you think of skittle looks? Are they for you?
Enjoy & until tomorrow, Amy Lee
*all products featured in this post were purchased by me
Neon Dotticure
Tuesday, June 25, 2013
6/25/2013 12:28:00 PM
I am obsessed with neon manicures lately. I am totally in a neon place in life right now. I want every manicure to be bright and in your face. It must be because its Summer. Thats the only explanation I have.

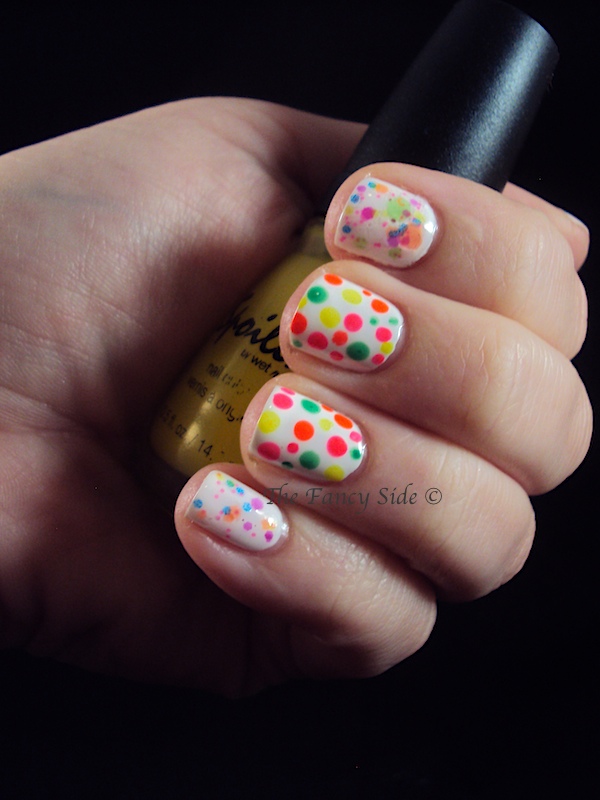

For this look, I started off with a base of my go to white, Sally Hansen's Ivory Skull. On my thumb, pointer, and pinkie I applied Lush Lacquers' Clowning Around. For the dots on my middle and ring finger I used China Glaze Pool Party (pink), Essie Shake Your $$ Maker (green), Spoiled Did I Dye it too Blonde? (yellow), and Studio M Sunset (orange).
What look do you keep repeating this summer?
Enjoy & until next time, Amy Lee
*all polishes featured in this post were purchased by me
"I Can't Believe It.....I'm on a Fingernail" Monsters University
Friday, June 21, 2013
6/21/2013 03:47:00 PM
I don't know about you all, but I love me some Monsters Inc. That movie came out when I was a kid and I've been impatiently waiting for the new installment (technically a prequel) ever since they hinted at it a few years ago. As far as I was concerned all the little kids lining up for this movie could get out of my way or risk getting trampled, because I've been waiting 12 years for this movie.
To celebrate, I've done some Mike and Sulley nails. I went to a showing last night and wore these. And the good news is, I loved the movie. It was so cute and everything I had hoped for.


I've put Sulley's fur on all fingers except my ring finger. Now since I don't really have furry polish, I decided to do his fur with some OPI Liquid Sands, because it seemed fitting. I started out with a base of OPI Tiffany Case and dotted in spots of OPI Can't Let Go. To create Mike's eye I started off with a base of China Glaze's Gaga for Green. Once that dried, I free handed some circles (its ridiculously hard to do that, by the way) in Sally Hansen's Ivory Skull (white), China Glaze Hanging in the Balance (blue), and dotted the pupil in with a black striper.
I love this look. Although I wish Mike's eye was a little better looking. Here's a picture of Mike and Sulley from their new movie, Monsters University. How did I do?

Are you planning on seeing this movie?
Enjoy & until next time, Amy Lee
*all products featured in this post were purchased by me
Blinged Out Trout
Thursday, June 20, 2013
6/20/2013 04:36:00 PM
I can't believe I forgot to post these earlier. These are the nails that I wore for my birthday celebration. My sweet boyfriend threw me a party with my friends. He is so sweet and totally spoils me with things like that.
So for the celebration, I decided to go with something a little on the simpler side (hahaha, simple, me?).


I decided to wear Butter London's Trout Pout. If there is one polish I think everyone should own, it is so this color. Then to make it a little fancy I pretty much blinged out my ring finger with rhinestones. Like, I went crazy on that.
What is the one polish you think everyone should own?
Enjoy & until next time, Amy Lee
*all products featured in this post were purchased by me
Saran Wrap Mani
Wednesday, June 19, 2013
6/19/2013 12:15:00 AM
Today, I've tried a completely new mani look. I've been wanting to do the Saran Wrap mani for quite sometime, and now I feel stupid for waiting so long, because it was super easy and gives a gorgeous effect.
I felt like I had pools on my nails while wearing these. But enough chatter, lets look at the nails. They're really the reason you are here anyways. :-)


To create these nails, I started with a base of China Glaze Highlight of my Summer on all nails except my ring finger. On the ring finger I used two coats of China Glaze Water you Waiting For. After letting Highlight of my Summer dry completely, I then painted on one coat of China Glaze Ride the Waves. While that was wet, I then took a crumpled ball of Saran Wrap, touched that to the nail and pulled away. It created this awesome swirly effect that I loved.
What do you think these nails look like? Do you think they look like a pool?
Enjoy & until next time, Amy Lee
What do you think these nails look like? Do you think they look like a pool?
Enjoy & until next time, Amy Lee
*all products featured in this post were purchased by me
Pink Studded Triangles
Tuesday, June 18, 2013
6/18/2013 03:45:00 PM
*some products in this post were provided for review
Hi all! Today I'm really excited to show you a look that kind of made my camera freak out a little bit. ;-) KKCenterHK recently sent over some products for me to review and today I'm going to show you the Circular Nail Studs in 2mm Pink. These studs are the perfect size, you can easily wear more than one on a nail and they are a juicy light pink color. Lets take a look at the nails. I've never had the opportunity to use studs on my nails before, so I was very excited to take these on a test run.


For the base of the nails I used Essie Off the Shoulder. Once that was dry, I taped out a big triangle using Scotch Tape and painted it with China Glaze Pool Party, a bright neon pink. After Pool Party dried, I taped off an even smaller triangle and filled it in with Butter London Snog. At the top of each triangle I placed a stud. To place the studs, I dotted on some Seche Vite top coat, placed the studs, waited a few moments, then topped the whole look with more Seche Vite.
Overall, I really like this look. The studs were great. They didn't catch on anything and wore easily. They also put up with a lot of abuse before one finally popped off.
If you are interested in getting these studs, you can find them here. There are 50pcs in a pack for $4.23.
Enjoy & until tomorrow, Amy Lee
*the studs featured in this post were provided for review, all polishes were purchased by me
Salon Perfect Neon Collision Collection
Monday, June 17, 2013
6/17/2013 01:02:00 PM
Today I have the 6 polishes of a new collection from Salon Perfect. I've been pretty excited about these polishes since hearing about them. I searched all over several Wal-Marts to find them before they put out the big displays. Mostly because I'm an impatient polish whore.

These are from the new Neon Collision collection by Salon Perfect. Salon Perfect is available at Wal-Mart and they retail for only $3.98 so they are very affordable. I also happen to know that these are made by the same company as China Glaze, so you can't go wrong purchasing them.


Up first we have Jolt. Jolt is a micro matte glitter bomb packed with neon yellow and neon orange glitters. I've done three layers of Jolt on all fingers except my ring finger. On the ring finger, I've layered one coat over Sally Hansen's Ivory Skull.


Bang is a micro matte glitter bomb packed with neon orange and neon yellow glitters. I've done three layers of Bang on all fingers except my ring finger. On the ring finger, I've layered one coat over Sally Hansen's Ivory Skull.


Next we have Shocked. Shocked is a micro matte glitter bomb packed with neon magenta and neon blue. I've done three layers of Shocked on all fingers except my ring finger. On the ring finger, I've layered one coat over Sally Hansen's Ivory Skull. This is one of my favorites. It's so yummy.


Exploded is a micro matte glitter bomb packed with neon pink (which reads very orange) and neon yellow glitters. I've done three layers of Exploded on all fingers except my ring finger. On the ring finger, I've layered one coat over Sally Hansen's Ivory Skull.


Finally we have Kaboom. Kaboom is a micro matte glitter bomb packed with neon teal and neon green glitters. I've done three layers of Kaboom on all fingers except my ring finger. On the ring finger, I've layered one coat over Sally Hansen's Ivory Skull.

Four out of these six polishes have a match so to speak. They are the same color combos they just switch which color is dominant. I've done a comparison here. Bang and Jolt both have the neon orange and neon yellow glittlers, while Zapped and Kaboom both have the teal and neon green. Personally I feel like Exploded (neon pink) looks so similar to Bang, I would have liked to see them do a more neon blue with the magenta like Shocked and continue that theme.
Formula wise, I was a little terrified. I first swatched Jolt, and it was terribly thick and gritty. However, I think this was a fluke as all the others applied beautifully, layered well, and dried fairly smooth. I'm going to apply thinner to Jolt and I have a feeling it will right all the problems I experienced. These polishes build up to opaqueness by three layers so are easy to wear on their own or they layer well on top of polish undies. I've also discovered that Seche Vite doesn't go well with these polishes. I think its because there is no color in the base pigment, so it has nothing to grip to. If you use a normal (not fast dry top coat) they last much longer.
Personally my picks from this collection are Shocked and Kaboom. If you want an orangey one, go with Exploded.
Which color is your favorite?
Enjoy & until tomorrow, Amy Lee
*all products featured in this post were purchased by me
Neon Gradient Triangles
Friday, June 14, 2013
6/14/2013 11:59:00 AM
Do you ever have a look that you love so much, that it makes you sad to take it off? I wore this look for four days straight. That is huge for me. Usually manicures never last that long in Amy land.
I was inspired by this look, originally found via Pinterest. I love the colors she used, so I may have to try them out in the future as well.


I started off by painting my nails with my favorite white, Sally Hansen Ivory Skull. After allowing that time to dry I taped off triangles with scotch tape, then sponged on a gradient of Studio M Thunderbolt, China Glaze Shocking Pink, and China Glaze Flip Flop Fantasy.
I don't know about you all, but I am really digging all the neon looks out there right now.
What is your favorite neon color to wear right now?
Enjoy & until tomorrow, Amy Lee
*all products featured in this post were purchased by me
Versailles Romance Art
Thursday, June 13, 2013
6/13/2013 09:58:00 AM
After swatching the L'Oreal Versailles Romance collection (see swatches here and here), I decided to end with some nail art featuring all the polishes. I wanted to do something simple that showed off all the colors.


I started with a base of Creme Puffs, and then freehanded triangles of Royally Yours, The Palace Life, Macaroon Madly, Pistachio Dream, and Lacey Lilac. I tried to leave strips of Creme Puffs in between each triangle.


I feel like they ended up looking like strange easter eggs on my fingers. What do you think? Next time I try something similar, I want more contrasting colors and striping tape involved.
What do you think of this look?
Enjoy & until tomorrow, Amy Lee
*all products featured in this post were purchased by me
Versailles Romance Collection: Part 2
Wednesday, June 12, 2013
6/12/2013 10:50:00 AM
Today I have for you the last 3 of the 6 polishes from L'Oreal's Versailles Romance Collection. This was a spring pastel collection for L'Oreal. If you would like to see the first half of this collection, see the post here.

This collection consists of 6 pastel shades, 4 cremes and 2 cremes with golden shimmer in them.


Finally we have The Palace Life. The Palace Life is a pastel pink creme. This pink is so close to skin tone for me it was a little scary. I didn't know I was that pink. Here I'm wearing 3 thin coats.
Overall I'm a big fan of this collection. The two must haves for me are Pistachio Dream and Macaroon Madly.
Which color is your favorite? Be sure to check in tomorrow to see some nail art featuring this collection.
Enjoy & until tomorrow, Amy Lee

This collection consists of 6 pastel shades, 4 cremes and 2 cremes with golden shimmer in them.


Pistachio Dream is a beautiful pastel mint green filled with a light green shimmer. The shimmer in this polish is more noticeable in the bottle than on the nail. Here I'm wearing 3 thin coats.


This is Macaroon Madly a light peach creme. My GAWD I love this polish. It is a gorgeous color and wears so beautifully. Here you are looking at 3 thin coats.


Overall I'm a big fan of this collection. The two must haves for me are Pistachio Dream and Macaroon Madly.
Which color is your favorite? Be sure to check in tomorrow to see some nail art featuring this collection.
Enjoy & until tomorrow, Amy Lee
*all products featured in this post were purchased by me


